How to create a Time-Lapse Movie with Google Street View
by Preetha[ Edit ] 2012-09-11 10:06:03
To get started, you would obviously need hundreds of Street View images. It is not practical to capture these many screenshots manually so what I have done is written a small script that does two things - it capture the screen and then advances the Street View in the browser by one step. And this runs in a loop.
Step 1. Create a new profile (or use this profile) in SnagIt that captures the screen and auto-saves the screenshot to a file in the background. Make sure that you capture screenshot images at 1280*720 for publishing a 720p video.
Step 2. Assuming that you have AutoHotkey on your computer, create a new text file and copy-paste the following lines into that file. Save the file with .ahk extension.
1
2
3
4
5
6
7
Loop <br />{
<br /> Send {Up down} ; Press the UP arrow key to advance
<br /> Sleep 1
<br /> Send {Up up}
<br /> Sleep, 1000 ; Wait for the Street View images to load in the browser
<br /> Send, {PRINTSCREEN} ; Capture the screen and save the image to a file
<br />}
Step 3. Open Google Maps Street View in the browser and run the .ahk file that you created in the previous step. Once you have captured enough images, end the script by right-clicking the Autohotkey icon in the taskbar.
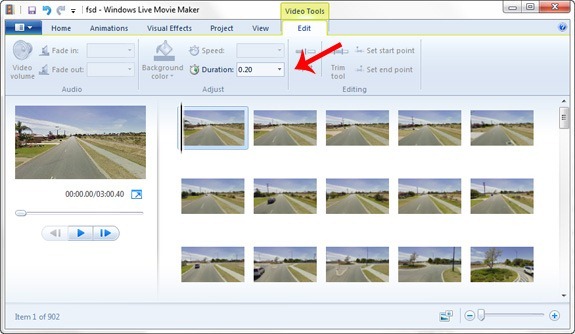
Step 4. Open Windows Live Movie Maker (or iMovie if you are on a Mac) and import all these images into a new project. After the import is complete, select all the images and under the Video Tools -> Edit, set the image duration to 0.2 seconds.
That's it. Go to File -> Save Movie to create your first time-lapse video of Street View and upload it to YouTube in HD (720p).

